SharePoint Foundation 2010 does not come with the native ability to index Acrobat PDF documents, however it can easily be configured to do this. By default, if you upload a PDF document to SharePoint Foundation 2010 you should see something like this:
When you attempt to run a search for a term in the document (in this case ciaops) you will find that the search returns no result like shown here:
The reason is that SharePoint Foundation 2010 relies on something called an iFilter to provide the ability to index documents. You require an iFilter for each different document you wish indexed in SharePoint Foundation 2010. By default, the iFilters for most Microsoft Office documents now get installed as part of the SharePoint Foundation 2010 pre-install. Ones for other common file types, like Acrobat PDF documents don’t, however they can be manually configured.
The following process will work on both a SharePoint Foundation 2010 standalone member server and a Small Business Server 2011 Standard server.
The first step in the process is to download and install the PDF iFilter program from Adobe. To do this visit:
http://www.adobe.com/support/downloads/detail.jsp?ftpID=4025
It is important to remember that SharePoint Foundation runs on a 64 bit operating system so you are going to need a 64 bit version of the PDF iFilter.
Login to your SharePoint Foundation 2010 server as an administrator and download the file to your SharePoint Foundation Server 2010 and expand the file. You should find a single installation file like shown below.
Double click the installer file to run. Accept any User Access Control (UAC) that is presented.
The iFilter installation process should now commence.
Press the Next button to continue.
Accept the License Agreement and press Next to continue.
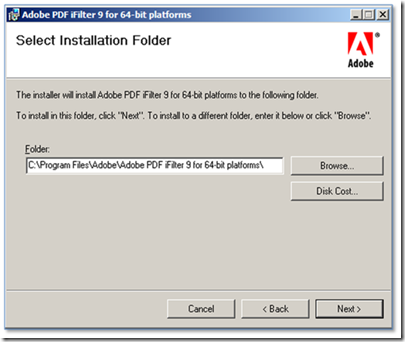
Select a location to install the iFilter files, by default this will be your C: Drive.
Press Next to continue.
Press Next to continue.
Press Close to complete the installation.
To add the PDF Icon to SharePoint download the PDF icon from:
http://www.adobe.com/images/pdficon_small.gif
and save it to:
C:\Program Files\Common Files\Microsoft Shared\Web Server Extensions\14\TEMPLATE\IMAGES\
You will generally need administrator privileges to do this.
This may mean you have to save it another location and then copy and paste to the destination.
Locate the file c:\program files\common files\Microsoft shared\web server extensions\14\template\xml\docicon.xml. Right mouse click on the file to edit.
Locate the <ByExtension> element where you will see entries for each icon starting with <Mapping key=. Enter the following on a new line:
<Mapping key=”pdf” Value=”pdficon_small.gif” OpenControl=””/>
Note, that the extension names do not have to be in alphabetical order so it is best to place the entry at the end of the existing list. Also ensure that the correct filename for the icon is used in the entry line.
When complete, save the file and exit notepad.
To see the icon immediately in WSF start a command prompt on the server via Start and Right mouse clicking on Command prompt and selecting Run as Administrator from menu that appears.
At the prompt enter iisreset to restart Internet Information server. Don’t forget that resetting IIS will also affect other applications on the server. When the process is complete, exit the DOS prompt and examine any SharePoint Foundation 2010 libraries that contain PDF documents.
Next, copy the following script to a file called Addextension.vbs on your system
Sub Usage WScript.Echo “Usage: AddExtension.vbs extension” WScript.Echo end Sub Sub Main if WScript.Arguments.Count < 1 then Usage wscript.Quit(1) end if dim extension extension = wscript.arguments(0) Set gadmin = WScript.CreateObject(“SPSearch4.GatherMgr.1″, “”) For Each application in gadmin.GatherApplications For Each project in application.GatherProjects project.Gather.Extensions.Add(extension) Next Next End Sub call Main
Now run a Command Prompt as an administrator by right mouse clicking on the Command Prompt icon like and selecting Run as administrator.
Accept any UAC that appears.
Change to the directory where you saved the VBS script and type:
Wscript addextension.vbs pdf
You should see no result if the script executes correctly.
If you receive an error like shown above, check that your Search Service is enabled in SharePoint.
Run Regedit and accept any UAC.
Locate the registry (above image is incorrect for SBS. Office Server key doesn’t exist) HKEY_LOCAL_MACHINE\SOFTWARE\Microsoft\Shared Tools\Web Server Extensions\Office Server\14.0\Search\Setup\ContentIndexCommon\Filters\Extension\
HKEY_LOCAL_MACHINE\SOFTWARE\Microsoft\Shared Tools\Web Server Extensions\14.0\Search\Setup\ContentIndexCommon\Filters\Extension\
Right mouse click on Extensions and select New and Key.
Add the key .pdf
Right mouse click on (Default) in the right hand window and select Modify from the menu that appears.
Enter the following into the Value Data field:
{E8978DA6-047F-4E3D-9C78-CDBE46041603}
Close regedit.
Click Start | Administrative Tools | Services and right mouse click on Services and select Run as Administrator from menu that appears.
Scroll down the list of services and locate the service SharePoint Foundation Search V4.
Right mouse click on the service and select Restart from the menu that appears.
You should see the service restart.
Close the Services window.
Run a Command Prompt as an administrator again by right mouse clicking on the icon and selecting Run as Administrator from the menu that appears.
Any PDF documents you now add to SharePoint will be indexed, however those already there will not be indexed until a full crawl is run.
To launch a full manual crawl change to the directory:
C:\program files\common files\microsoft shared\web server extension\14\bin
And run the following command:
Stsadm –o spsearch –action fullcrawlstart
This will commence a full reindex of all SharePoint information. This reindex may take a while to complete and may impact the performance of your SharePoint Server.
If a search is now run using the same term (here ciaops) you can see that now returns a hit from the PDF and from text inside that document (rather than just the title). This indicates that the PDF search is operating correctly.
Reference – http://support.microsoft.com/kb/2293357


